Are you searching for Thanksgiving crafts for Kids that are easy to organize in a busy classroom? Are you struggling to balance fun with educational value during the holiday season? Are you wondering how to keep toddlers safe and engaged while promoting creativity and thankfulness?
Thanksgiving crafts for kids offer the perfect blend of seasonal joy, hands-on learning, and emotional development. Thanksgiving Crafts for Kids are not only fun but also serve as powerful learning tools. These crafts can teach gratitude, history, fine motor skills, and creativity—all wrapped in the joy of making something with their own hands.
Let’s explore how Thanksgiving crafts for Kids can turn your classroom into a festive, educational space where children feel proud of their creations and connected to the spirit of gratitude.
Benefits of Thanksgiving Crafts for Kids
Crafting with children is more than just fun—it nurtures creativity, reinforces family bonds, and encourages expressive communication. Engaging with hands-on activities like Turkey masks or nature‑inspired leaf art helps young children develop fine motor skills, problem-solving, and focus. Making crafts with gratitude can nurture emotional intelligence and provide meaningful teaching moments. Thanksgiving activities often double as décor, making kids proud of their creations and seeing how their work brightens a home environment.
Safety First: Choosing the Right Thanksgiving Craft Materials
In any preschool or daycare setting, safety is non-negotiable.
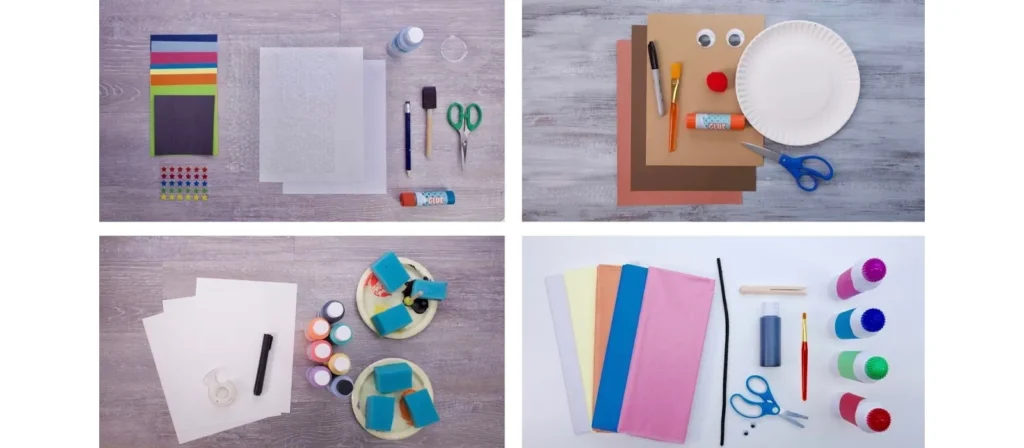
IL craft materials must be non-toxic, easy to clean, and suitable for small hands. We recommend the following for all Thanksgiving crafts for kids:
- Washable glue sticks
- Blunt-tip child scissors
- Nontoxic markers and paints
- Pre-cut craft foam or felt
- Brown paper bags, colored construction paper
- Popsicle sticks, cotton balls, and googly eyes
Avoid anything sharp, overly glittery (choking hazard), or challenging to clean. Also, always supervise the use of glue, scissors, and any paint. If you manage a large group, set up crafting stations by material type.
We often suggest using recyclable materials from your classroom—old boxes, fabric scraps, even leftover tissue paper. Eco-friendly and budget-friendly go hand in hand.
34 Fun and Easy Preschool Thanksgiving Craft Ideas
Here is a curated selection of 34 creative, classroom-friendly Thanksgiving crafts for kids. Each one includes a short introduction, a list of materials, and step-by-step instructions. These projects are cost-effective, safe for preschoolers, and designed for educational environments.
1. Turkey with Pine Cones
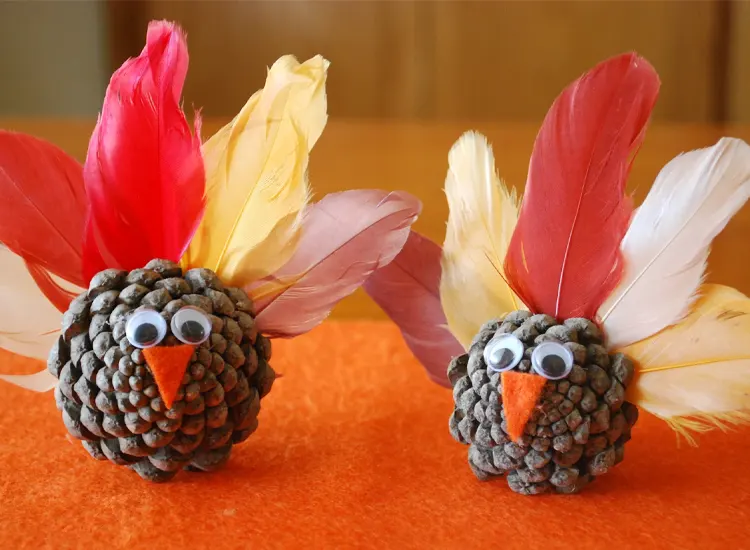
Bring the charm of the outdoors inside with this adorable pine cone turkey. Ideal for preschoolers, this craft merges nature and imagination. It’s not just fun—it’s tactile and educational. The finished turkey can be proudly displayed on the Thanksgiving table or mantelpiece.
Materiali necessari:
- Medium-sized pine cones
- Googly eyes
- Brown, red, orange, and yellow felt or construction paper
- Craft glue (tacky glue works best for natural materials)
- Scissors
- Small red pom-pom or felt for the wattle
- Orange craft foam or paper for the beak
Step-by-Step Instructions:
- Prepare the Pine Cone: Choose a pine cone that sits flat. If needed, trim the bottom with scissors.
- Cut the Feathers: From the colored felt or paper, cut out several teardrop-shaped feathers in fall colors.
- Attach the Feathers: Using glue, attach feathers to the back of the pine cone. Arrange them in a fan shape to mimic tail feathers. Let dry.
- Create the Face: Glue googly eyes near the tip of the pine cone where the face will go.
- Add Beak and Wattle: Cut a small triangle for the beak and a dangling red teardrop shape for the wattle. Attach under the eyes.
- Let It Dry Completely: Allow several hours to dry before moving or displaying.
Learning Benefits:
- Enhances fine motor skills through cutting and gluing
- Introduces textures and natural elements
- Encourages storytelling and imaginative thinking (“Where does the turkey live?” or “What is its name?”)
2. Turkey Balloon
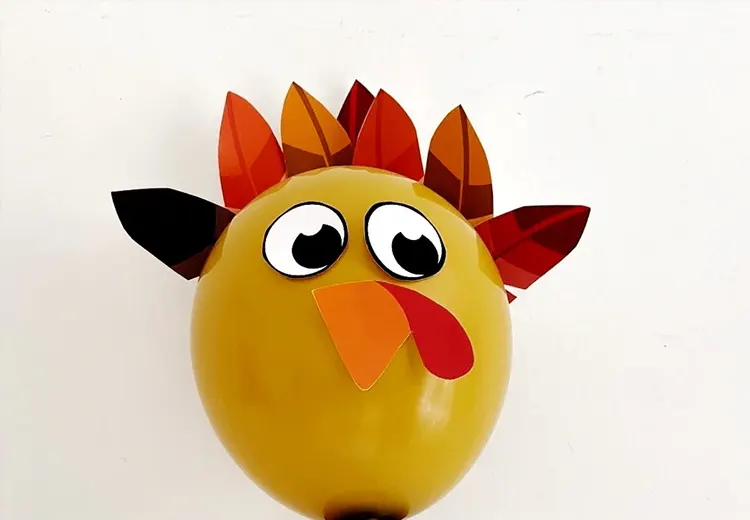
This turkey balloon craft is as cheerful as it is simple. Preschoolers love anything inflatable, and turning a balloon into a bouncing turkey brings a whole new level of excitement. It’s perfect for party decorations or as a playful centerpiece during Thanksgiving dinner.
Materiali necessari:
- Brown latex balloon
- Construction paper (red, orange, yellow, white)
- Black marker
- Glue dots or double-sided tape
- Scissors
Step-by-Step Instructions:
- Inflate the Balloon: Blow up the balloon and tie it securely.
- Create the Feathers: Cut large feather shapes from construction paper. Use multiple colors for variety.
- Attach the Feathers: Tape or glue the feathers to the back of the balloon. Arrange in a fan shape.
- Make the Face: Cut out two white circles for eyes and use the marker to draw pupils. Add a triangle for the beak and a red paper wattle.
- Stick Everything in Place: Use glue dots to attach all face pieces to the front of the balloon.
- Optional – Add Feet: Cut small paper feet and tape to the base or attach pipe cleaners for standing support.
Learning Benefits:
- Promotes shape recognition and spatial reasoning
- Encourages color identification and creativity
- Supports hand-eye coordination when applying small features
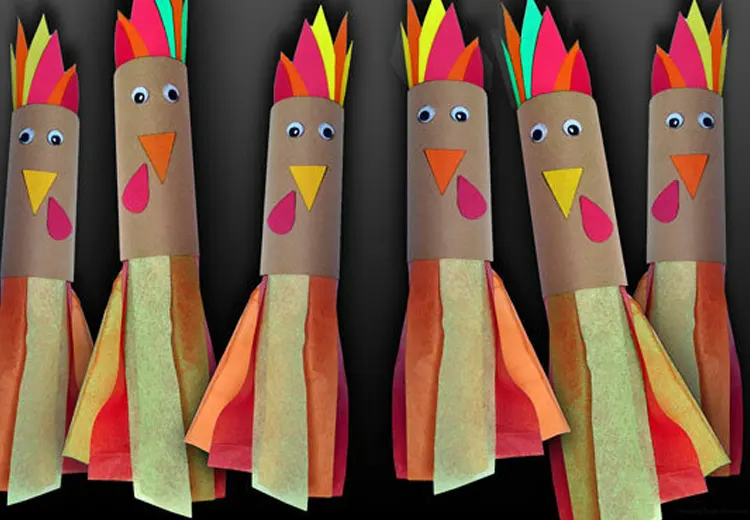
3. Paper Roll Turkey
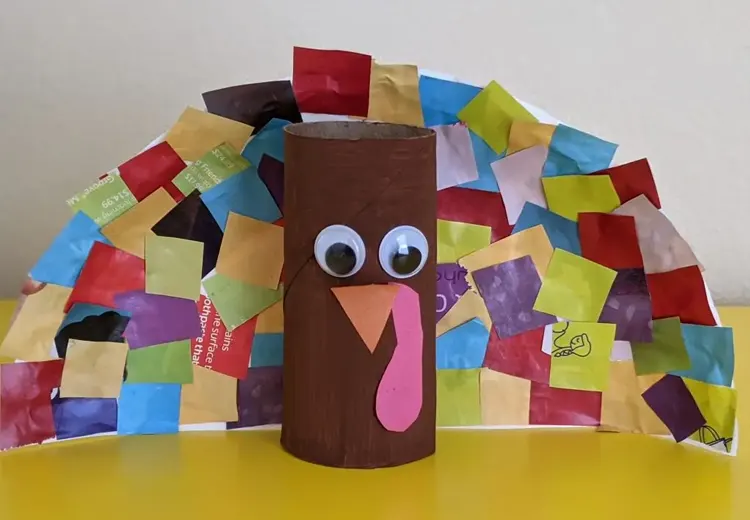
Paper roll turkeys are a preschool classic. They’re recyclable, budget-friendly, and endlessly customizable. Each child can create a turkey that reflects their personality, complete with googly eyes and vibrant feathers.
Materiali necessari:
- Toilet paper rolls or cardboard tubes
- Brown paint or brown construction paper
- Colored construction paper (red, orange, yellow, green)
- Googly eyes
- Glue stick or liquid glue
- Safety scissors
- Optional: Stickers or glitter for decoration
Step-by-Step Instructions:
- Wrap or Paint the Tube: Either paint the entire paper roll brown or wrap it in brown paper. Allow to dry if using paint.
- Cut and Decorate Feathers: Let the child cut long ovals from colored paper. Decorate with crayon patterns if desired.
- Glue the Feathers: Attach the feathers to the back inside of the roll using glue. Overlap slightly to create a full fan.
- Make the Face: Glue googly eyes on the front. Add a triangle beak and a dangling red wattle under the eyes.
- Optional Personalization: Write the child’s name on the front or use it as a place card for the holiday table.
Learning Benefits:
- Develops scissor and gluing skills
- Reinforces sequencing and following steps
- Offers a chance to practice emotional expression (e.g., drawing facial expressions)
4. Felt Thanksgiving Wreath
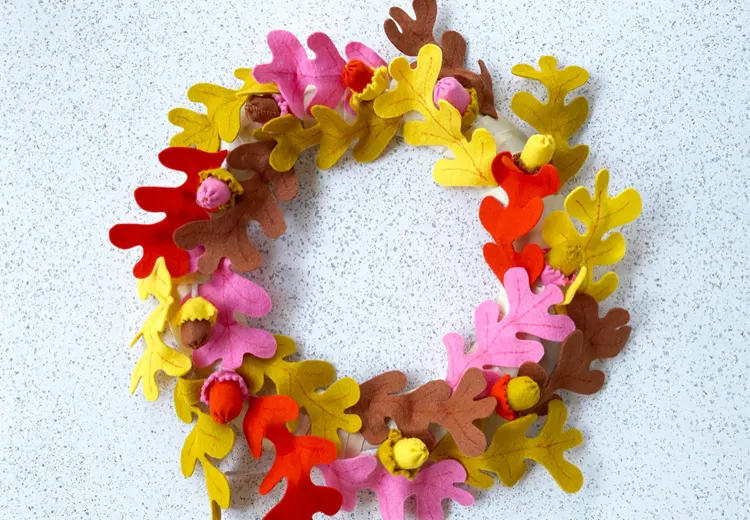
Turn simple materials into an elegant seasonal decoration with this felt wreath. Preschoolers will love layering leaves and choosing colors while learning about autumn and the harvest season.
Materiali necessari:
- Paper plate (cut into a ring)
- Autumn-colored felt (red, orange, brown, yellow, green)
- Pencil
- Scissors
- Fabric or craft glue
- Ribbon for hanging
Step-by-Step Instructions:
- Prepare the Wreath Base: Cut out the center of the paper plate to create a ring.
- Trace and Cut Leaves: Use stencils or freehand leaf shapes. Cut out at least 10–15 felt leaves in a variety of colors.
- Arrange the Leaves: Lay out the design before gluing. Let kids decide the pattern.
- Glue Down the Leaves: One by one, glue leaves onto the plate ring, slightly overlapping for a full effect.
- Add a Ribbon Loop: Glue or staple a ribbon to the top for easy hanging.
- Optional Touches: Write the word “Thankful” or the child’s name with fabric paint.
Learning Benefits:
- Encourages planning and pattern recognition
- Enhances tactile sensory exploration
- Connects art with holiday traditions
5. Autumn Fork Tree

Using a plastic fork as a brush brings a surprising twist to traditional painting. This Autumn Fork Tree project blends art with exploration, as kids discover texture and form by stamping colorful leaves into life.
Materiali necessari:
- White construction paper or cardstock
- Brown, red, orange, yellow, and gold paint
- Plastic forks
- Paintbrush
- Paper plate (for palette)
Step-by-Step Instructions:
- Paint the Tree Trunk: With a paintbrush, help the child draw a simple trunk and branches using brown paint. Let dry for a minute.
- Prepare the Paint: Pour red, yellow, and orange paint onto a paper plate.
- Stamp with Forks: Dip the fork tines into one paint color at a time and press around the top of the trunk.
- Layer the Leaves: Use different colors and angles to create a vibrant canopy of fall leaves.
- Let Dry and Display: Once finished, lay flat to dry completely before hanging.
Learning Benefits:
- Introduces tool-based art beyond brushes
- Strengthens hand and wrist control
- Offers a safe environment for experimentation and exploration
6. Thanksgiving Slime
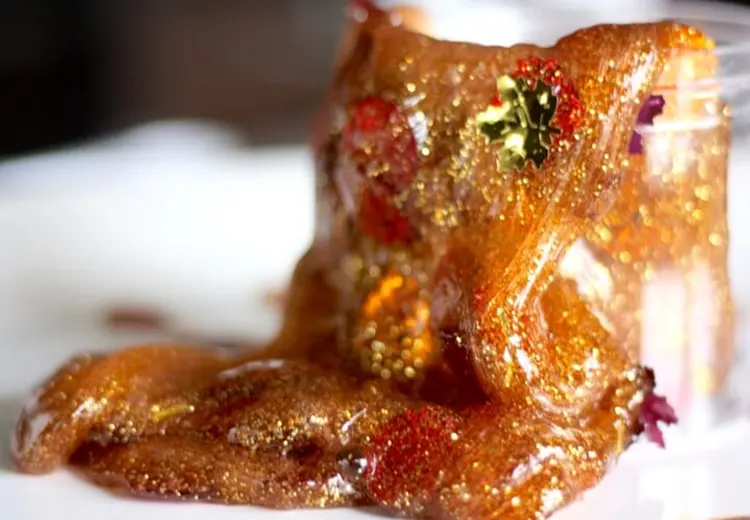
Thanksgiving Slime combines sensory play with seasonal sparkle. It’s squishy, stretchy, and filled with glittery colors inspired by autumn. Preschoolers can help make it and then play with it for hours, developing tactile awareness and fine motor strength while having tons of gooey fun.
Materiali necessari:
- ½ cup clear school glue
- ½ cup water
- ½ tbsp baking soda
- 1 tbsp contact lens solution (must contain boric acid)
- Orange, red, and gold glitter
- Small fall-themed confetti (optional)
- Mixing bowl and spoon
Step-by-Step Instructions:
- Mix Glue and Water: Pour glue and water into a bowl and stir until combined.
- Add Glitter: Sprinkle in your chosen glitter and mix well. Add fall confetti for a festive touch.
- Incorporate Baking Soda: Add baking soda and stir until fully dissolved.
- Add Contact Solution: Slowly add contact solution and stir. The mixture will begin to thicken and form slime.
- Knead the Slime: Use your hands to knead it until it’s no longer sticky.
- Store Properly: Keep in a sealed container when not in use.
Learning Benefits:
- Encourages sensory exploration
- Introduces basic measurement and chemistry
- Develops muscle control in fingers and hands
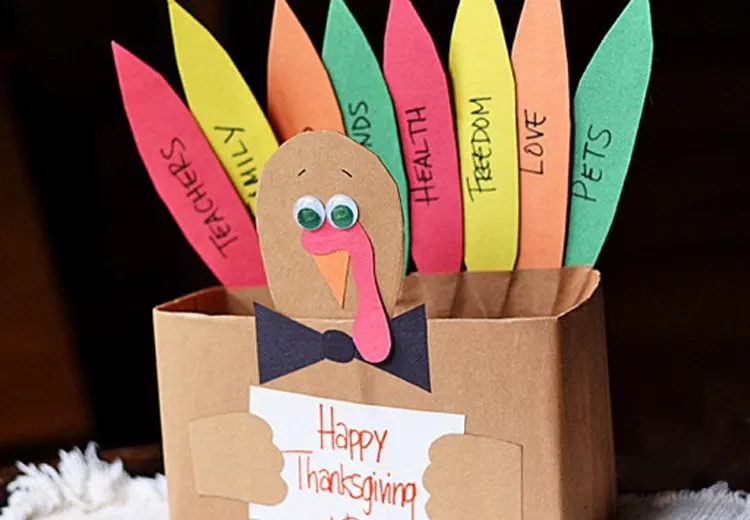
7. Family Thanksgiving Jar
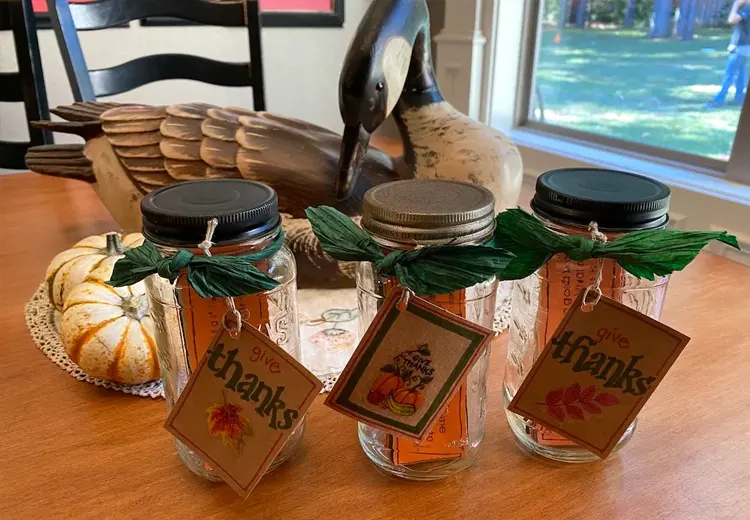
Create a meaningful family ritual with a Thanksgiving Gratitude Jar. Preschoolers can add daily notes about what they are thankful for. By Thanksgiving Day, the jar is filled with heartfelt reflections from the whole family—an emotional and creative keepsake.
Materiali necessari:
- Mason jar or plastic container with lid
- Decorative fall-themed stickers or washi tape
- Ribbon or twine
- Construction paper cut into small slips
- Markers or crayons
- Hole punch and gift tags (optional)
Step-by-Step Instructions:
- Decorate the Jar: Let children decorate the outside using stickers, tape, and markers.
- Prepare the Notes: Cut paper into 2” x 2” squares or leaf shapes.
- Create a Daily Routine: Each day leading up to Thanksgiving, help your child write or draw something they’re thankful for.
- Add Notes to the Jar: Fold the papers and place them inside.
- Read Aloud: On Thanksgiving, open the jar and read the notes as a family.
- Optional Keepsake: Tie a ribbon around the jar and label it with the year.
Learning Benefits:
- Builds emotional intelligence and gratitude
- Enhances verbal and drawing skills
- Creates a long-lasting family memory
8. Turkey Shirt
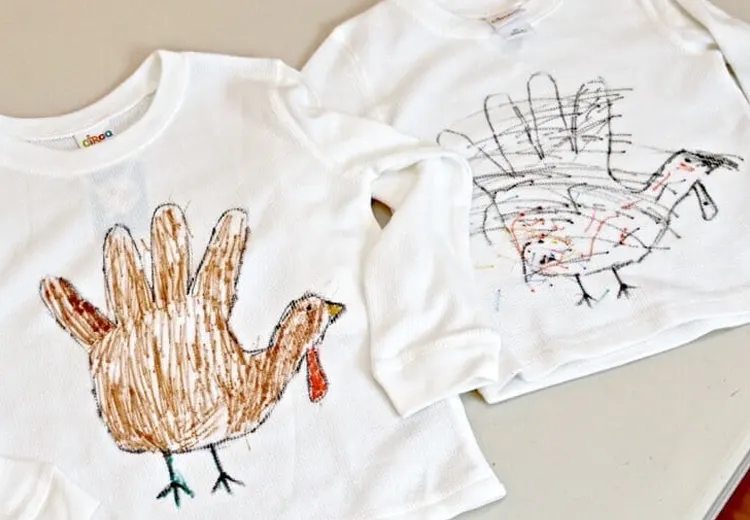
Let your preschooler wear their creativity with pride! The Turkey Shirt craft turns a plain t-shirt into wearable holiday art using their handprints and a few simple materials. It’s a perfect personalized project—and makes for a great photo op on Thanksgiving Day.
Materiali necessari:
- Plain white or light-colored t-shirt
- Fabric paints (brown, red, orange, yellow)
- Paintbrushes
- Paper plate (for paint)
- Black fabric marker
- A cardboard insert or a plastic to place inside the shirt
Step-by-Step Instructions:
- Set Up the Shirt: Place a cardboard inside the shirt to prevent paint from bleeding through.
- Paint the Hand: Paint your child’s hand in various colors for the feathers—each finger a different color.
- Stamp the Handprint: Press the painted hand onto the shirt to form the turkey’s tail feathers.
- Add the Body: Use brown paint or a brush to add a round turkey body below the handprint.
- Draw the Face: With a black marker or paint, add eyes, beak, and wattle.
- Let Dry Completely: Allow 24 hours to fully dry before wearing.
Learning Benefits:
- Incoraggia l'autoespressione
- Reinforces color recognition
- Creates a functional art piece
9. Pumpkin Wreath

This cheerful pumpkin wreath brightens any classroom or home with bold orange hues and fall flair. Using paper curls to build plump little pumpkins, kids will love watching their wreath form right before their eyes.
Materiali necessari:
- Orange construction paper
- Green construction paper
- Glue or tape
- Paper plate (center cut out)
- A pencil or crayon for curling
- Ribbon for hanging
Step-by-Step Instructions:
- Cut the Wreath Base: Cut out the center of the paper plate.
- Prepare Pumpkin Strips: Cut orange paper into strips (about 1” x 6”).
- Curl the Strips: Use a pencil to gently curl the paper strips.
- Form Pumpkins: Loop 3-4 strips into overlapping circles and tape or glue at the base. Add green paper for stems and leaves.
- Attach to the Plate: Glue the paper pumpkins around the paper plate wreath base.
- Add Ribbon and Hang: Tie a ribbon at the top and hang the wreath for decoration.
Learning Benefits:
- Develops spatial reasoning and 3D shape recognition
- Builds dexterity through curling and gluing
- Teaches parts of a pumpkin and seasonal symbols
10. Paper Bag Turkey
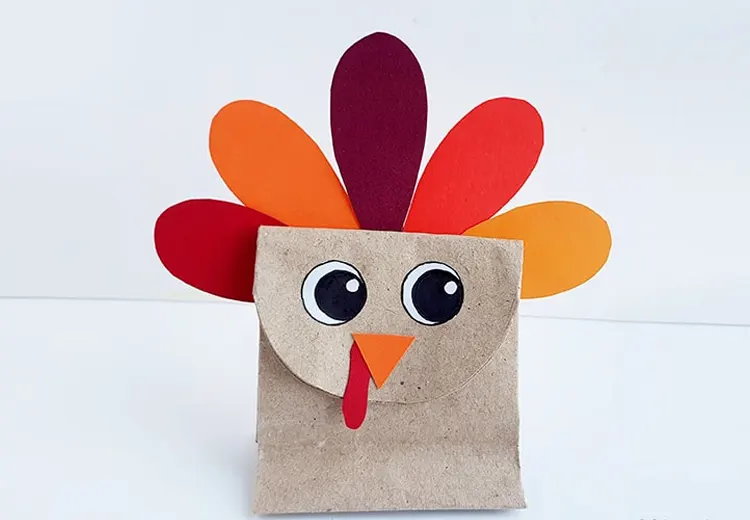
With a simple paper bag and some imagination, preschoolers can make a talking turkey puppet. This craft not only stimulates artistic creativity but also sets the stage for role play and storytelling.
Materiali necessari:
- Brown paper lunch bag
- Construction paper (red, orange, yellow, brown)
- Googly eyes
- Glue stick
- Scissors
- Crayons or markers
Step-by-Step Instructions:
- Prepare the Bag: Lay the bag flat with the flap facing up. This will be the turkey’s face.
- Add Facial Features: Glue googly eyes on the flap. Add a paper triangle beak and red wattle beneath.
- Create Feathers: Cut long feather shapes from colorful paper. Decorate with crayons if desired.
- Glue the Feathers: Attach feathers to the back of the bag so they fan out from behind the head.
- Draw Details: Let children decorate the body of the turkey with patterns, dots, or lines.
- Use as a Puppet: Once dry, kids can use their hand to animate the puppet for a Thanksgiving show.
Learning Benefits:
- Enhances narrative and communication skills
- Builds coordination through assembling pieces
- Supports early literacy through pretend play
11. Fall Suncatcher
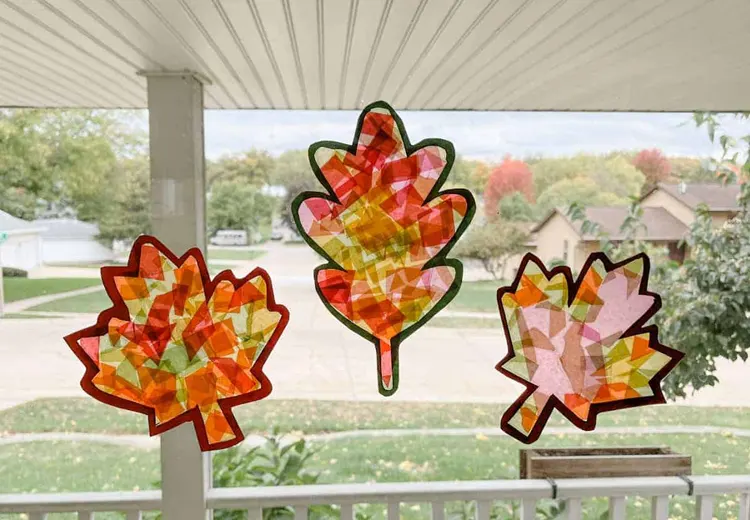
Capture the magic of autumn sunlight with a handmade fall suncatcher. This craft teaches preschoolers about light, transparency, and seasonal colors while offering a soothing creative process that doubles as seasonal home décor.
Materiali necessari:
- Clear contact paper
- Tissue paper (red, orange, yellow, brown)
- Scissors
- Black construction paper (for frame)
- Hole punch and string (optional)
Step-by-Step Instructions:
- Prepare the Frame: Cut out a large shape (like a leaf or circle) from black construction paper. Cut out the inner section, leaving a thick border to create a frame.
- Create the Sticky Surface: Cut two sheets of contact paper slightly larger than the frame. Stick the frame onto one sheet, sticky side up.
- Tear Tissue Paper: Help your child tear the tissue into small pieces—great for developing finger strength.
- Apply Tissue Bits: Let the child press tissue pieces randomly onto the sticky surface inside the frame. Overlapping is encouraged.
- Seal the Design: Place the second contact paper sheet on top, sticky side down. Press and smooth to seal.
- Cut and Hang: Trim the edges, punch a hole at the top, and add string to hang in a sunny window.
Learning Benefits:
- Teaches color blending and light concepts
- Strengthens fine motor skills
- Encourages independent artistic choices
12. Watercolor Turkey Tableware
Elevate the holiday table with one-of-a-kind, kid-designed watercolor turkey placemats or utensil holders. Each piece adds a burst of color and a child’s touch to Thanksgiving décor.
Materiali necessari:
- White cardstock or watercolor paper
- Watercolor paints and brushes
- Black permanent marker
- A cup of water and paper towels
- Optional: Lamination sheets or clear contact paper
Step-by-Step Instructions:
- Draw a Turkey Outline: Lightly draw a basic turkey shape with a pencil, or print out a simple outline as a template.
- Paint with Watercolors: Let your child paint the turkey using fall hues—browns, reds, oranges, and yellows. Encourage blending and color mixing.
- Add Details: Once dry, outline with a black marker and add eyes, beak, feathers, or even name labels.
- Protect the Art: Laminate the finished design or cover with contact paper to use as a placemat or utensil holder on the table.
Learning Benefits:
- Introduces watercolor techniques and color theory
- Offers ownership over holiday celebrations
- Promotes pride in creating something functional
13. Handprint Leaf Turkey
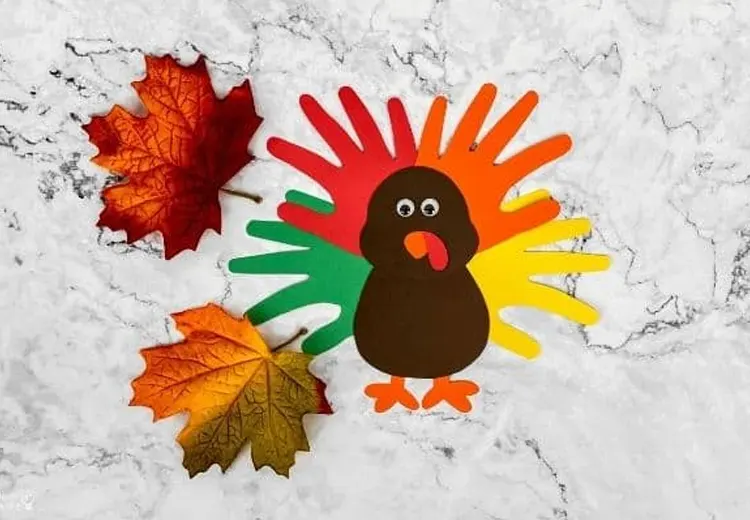
Handprint crafts are treasured keepsakes, and this version adds natural fall leaves to a classic turkey design. It’s a blend of nature and memory-making that parents often keep for years.
Materiali necessari:
- Brown, orange, red, and yellow construction paper
- Real dried leaves or artificial silk leaves
- Glue stick
- Googly eyes
- Scissors
- Pencil
Step-by-Step Instructions:
- Trace and Cut the Handprint: Have your child place their hand on brown paper and trace. Cut it out to form the turkey body.
- Attach the Leaves: Glue 4–5 leaves to the back of the handprint like feathers fanning out.
- Add the Face: Glue on eyes, a beak, and a red wattle to the thumb area of the handprint.
- Optional Mounting: Mount on a contrasting background or inside a frame for display.
Learning Benefits:
- Combining sensory experience with fine motor skills
- Strengthens awareness of seasonal change
- Preserves the size of the child’s hand for sentimental value
14. Book Page Leaves

Repurpose old books into elegant fall leaves that can be used for garlands, cards, or decorations. It’s a sustainable craft that introduces the idea of upcycling in a preschool-friendly way.
Materiali necessari:
- Pages from old or damaged books
- Leaf stencils or templates
- Crayons or watercolor paint
- Scissors
- Optional: Yarn or ribbon for garland
Step-by-Step Instructions:
- Trace Leaf Shapes: Place stencils over book pages and trace various leaf shapes.
- Cut Out Leaves: Carefully cut along the outlines.
- Decorate the Leaves: Use crayons for a textured effect or lightly brush on watercolor for transparent autumn tones.
- String Together (optional): Punch a hole at the top and string leaves together to create a garland.
Learning Benefits:
- Teaches reuse and recycling
- Develops cutting and tracing skills
- Introduces texture and layering in visual art
15. Thanksgiving Hat
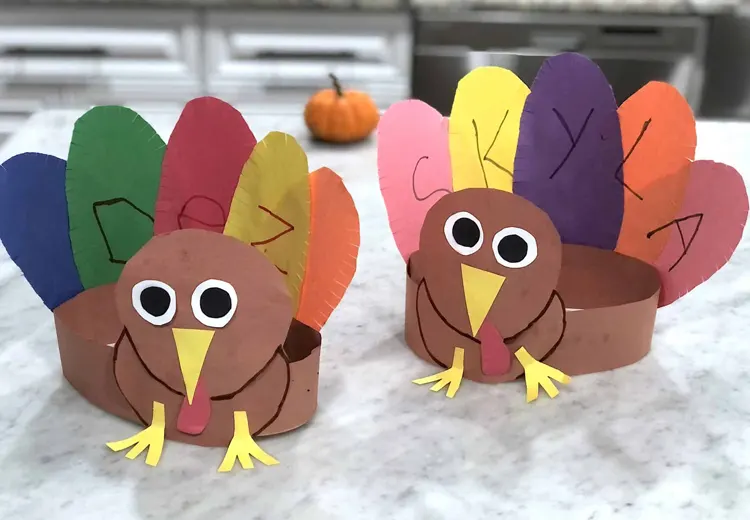
Let your child become part of the Thanksgiving story by crafting their wearable hat. Whether it’s a turkey crown or a pilgrim-style headband, this activity is full of imagination and role play.
Materiali necessari:
- Brown, black, yellow, and orange construction paper
- Glue or a stapler
- Scissors
- Feathers (real or paper)
- Optional: Crayons or markers for customization
Step-by-Step Instructions:
- Measure and Cut Headband Strip: Measure around your child’s head and cut a strip of paper to fit as the base.
- Choose the Style: Decide on a turkey crown (add feathers and eyes) or a pilgrim hat (use black with a yellow buckle).
- Decorate the Band: Add paper feathers, facial features, or historical elements depending on the design.
- Assemble and Wear: Glue or staple all pieces and secure the headband around your child’s head.
Learning Benefits:
- Enhances creativity and self-expression
- Encourages role play and historical imagination
- Promotes cultural discussions in an age-appropriate way
16. Autumn Leaf Lion
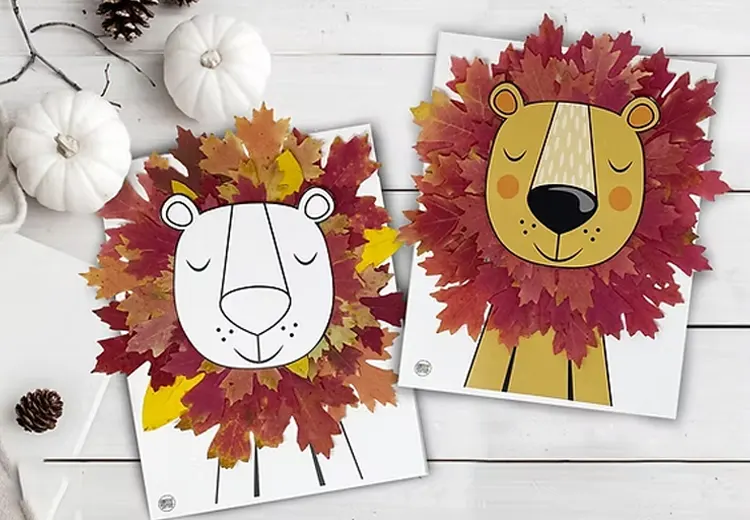
Blend wild imagination with nature’s colors by turning collected autumn leaves into a fluffy lion’s mane. This adorable project connects kids to the outdoors while sparking animal-themed fun during Thanksgiving week.
Materiali necessari:
- Paper plate
- Yellow and orange paint
- Brown, red, and yellow autumn leaves (dried and flat)
- Googly eyes
- Brown construction paper
- Glue
- Black marker
- Scissors
Step-by-Step Instructions:
- Paint the Plate: Let the child paint the center of the plate yellow to create the lion’s face.
- Add the Mane: Glue fall leaves around the outer rim of the plate to form the lion’s mane. Encourage layering for a full effect.
- Create the Face: Cut a circle for the nose from brown paper and draw a smile. Add googly eyes and a few drawn whiskers.
- Dry and Display: Once dry, hang the lion for a cheerful autumn wall feature.
Learning Benefits:
- Connects nature with imaginative animal play
- Reinforces spatial awareness and facial composition
- Strengthens sensory processing and fine motor skills
17. Colorful Wrapped Wheat

A twist on a traditional harvest symbol, this craft transforms dried wheat stalks into bright, colorful decorations using yarn or string. It’s simple, elegant, and introduces children to harvest imagery through hands-on work.
Materiali necessari:
- Dried wheat stalks or raffia
- Yarn (assorted fall colors)
- Scissors
- Glue (optional for reinforcement)
Step-by-Step Instructions:
- Choose Yarn Colors: Let your child select 2–3 colors that remind them of autumn.
- Wrap the Wheat: Starting at the base of each wheat stalk, wrap yarn tightly around the stem. Alternate colors or create stripes.
- Tie Off or Glue: Secure the end with a knot or dab of glue.
- Bundle Them: Gather several stalks together and tie with a ribbon to create a bouquet.
Learning Benefits:
- Strengthens hand coordination and grip
- Teaches about agricultural symbols and traditions
- Encourages creative patterning and color selection
18. Coffee Can Scarecrow
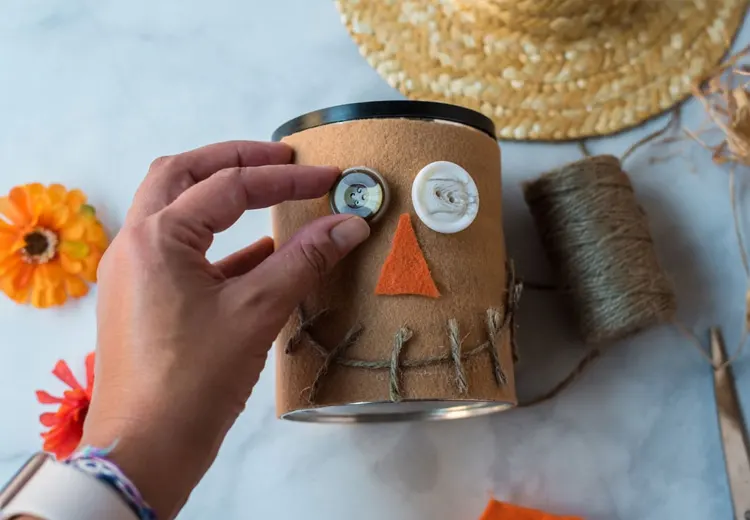
This upcycled coffee can scarecrow is the perfect combination of function and fun. It can guard your front porch or greet guests on your Thanksgiving table, all while introducing your preschooler to creative recycling.
Materiali necessari:
- An empty metal coffee can (cleaned and dry)
- Paint (tan or light brown)
- Straw or raffia
- Googly eyes
- Felt or fabric scraps
- Construction paper
- Glue
- Scissors
Step-by-Step Instructions:
- Paint the Can: Cover the outside of the can with tan paint and let it dry thoroughly.
- Add the Face: Glue on googly eyes and draw a smile with a marker. Add a triangular felt nose.
- Create Hair: Glue strands of raffia to the top of the can as scarecrow “hair.”
- Make the Hat: Use construction paper or felt to fashion a wide-brim hat and glue it on top.
- Optional Accessories: Add patches, bows, or buttons to personalize.
Learning Benefits:
- Teaches eco-conscious crafting
- Builds complex assembly and layering skills
- Encourages imaginative character creation
19. Turkey Windsock
Let your preschooler watch their craft flutter in the breeze with this festive turkey windsock. Using a recycled can or paper cup, the craft becomes an outdoor decoration and a conversation starter about fall weather.
Materiali necessari:
- Clean tin can or large paper cup
- Brown paint or brown paper
- Construction paper (red, orange, yellow)
- Ribbon or crepe paper strips
- Googly eyes
- String for hanging
- Hole punch
- Glue and tape
Step-by-Step Instructions:
- Cover the Base: Paint the can brown or wrap it with brown paper. Let dry.
- Add the Face: Glue on googly eyes, a beak, and a wattle.
- Attach Feathers: Tape long paper strips or ribbon inside the bottom rim to create the turkey’s tail feathers.
- Add Hanger: Punch two holes at the top and tie with a string to hang.
- Hang Outdoors: Let the windsock dance in the wind near a window or doorway.
Learning Benefits:
- Introduces weather and movement dynamics
- Encourages outdoor observation
- Develops color sequencing and pattern recognition
20. Acorn Crafts
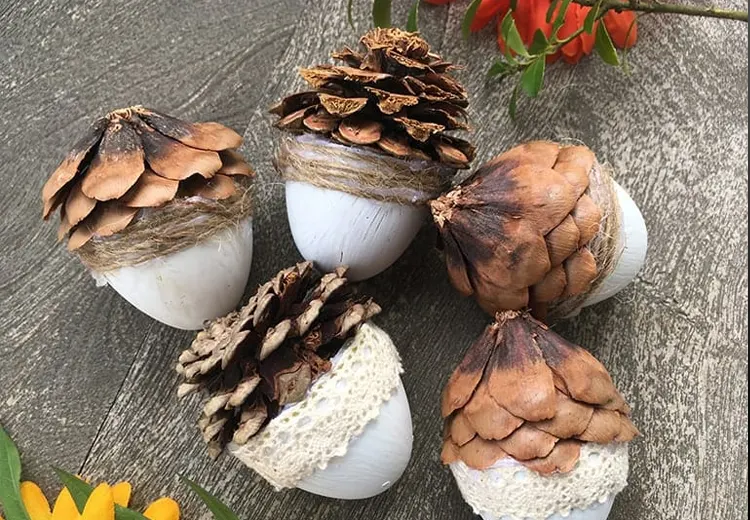
Tiny, tough, and full of autumn personality, acorns become the star of the show in this open-ended preschool craft. Use them to make characters, garlands, or nature collages.
Materiali necessari:
- Acorns (cleaned and dried)
- Acrylic paint or markers
- Googly eyes
- Pipe cleaners
- Felt or fabric scraps
- Glue
- Small twigs (optional for arms or legs)
Step-by-Step Instructions:
- Paint the Acorns: Let your child paint the acorns in bright or traditional fall colors.
- Add Features: Glue on googly eyes, wrap pipe cleaners for limbs, or create small hats from felt.
- Use Creatively: Turn them into tiny turkeys, elves, or even a counting game.
- Optional Garland: String decorated acorns together using a needle and thread to create a unique fall garland.
Learning Benefits:
- Encourages imaginative thinking and open-ended creativity
- Builds fine motor control through small object handling
- Offers lessons in sorting, counting, and patterning
21. Handpainted Turkey
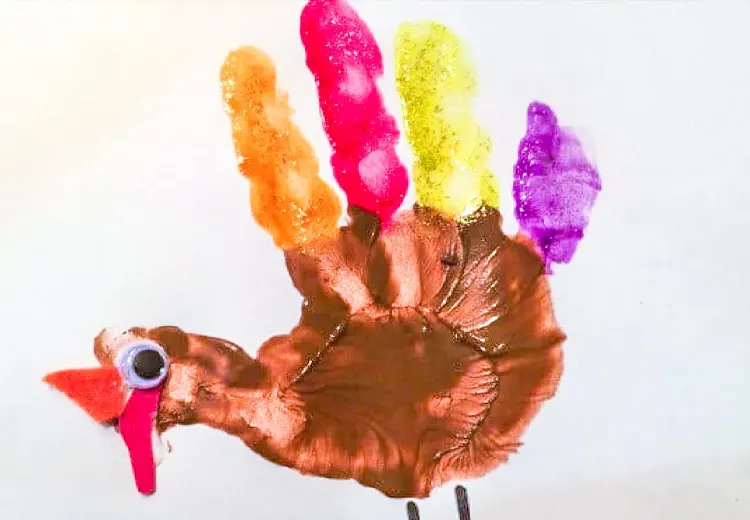
Sometimes the best turkey is the one made with your hands. This classic Thanksgiving activity lets preschoolers turn their painted hands into vibrant, feathered turkeys—each one uniquely expressive and endlessly charming.
Materiali necessari:
- White construction paper or cardstock
- Washable paints (brown, red, orange, yellow, green)
- Paintbrushes or sponges
- Paper towels
- Black marker
- Googly eyes (optional)
Step-by-Step Instructions:
- Paint the Hand: Apply brown paint to the palm, and different colors to each finger (representing feathers).
- Stamp the Handprint: Press the painted hand firmly onto the paper. Lift slowly to reveal the print.
- Add Details: Once dry, use a marker or paint to draw legs, beak, wattle, and eyes (or glue googly eyes).
- Personalize It: Add the child’s name and date for keepsake purposes.
- Optional Background: Create a setting—like a fall tree or grassy field—for storytelling.
Learning Benefits:
- Builds sensory awareness
- Enhances creative freedom and expression
- Reinforces hand-eye coordination
22. Turkey Marshmallow Lollipops
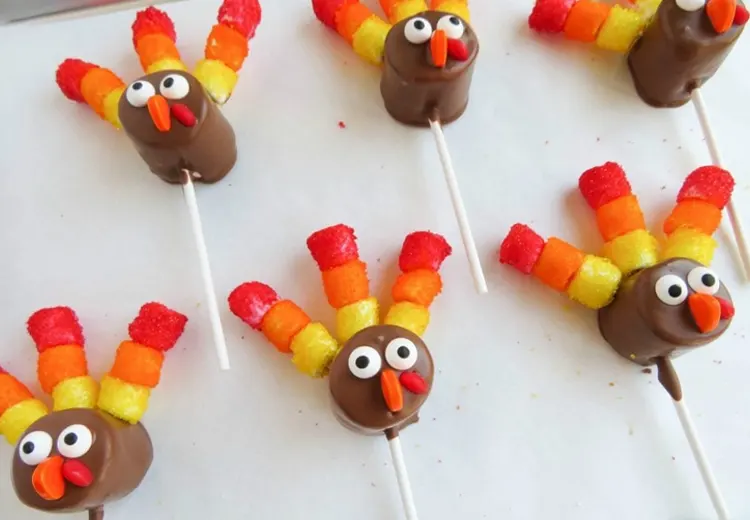
These sweet and silly turkey pops combine art with edible fun. Preschoolers can make their own candy treat while decorating a snack that can also serve as a party favor or dessert.
Materiali necessari:
- Large marshmallows
- Lollipop sticks
- Chocolate candy melts
- Candy eyes
- Candy corn (for feathers and beak)
- Red licorice string (wattle)
- Wax paper
- Microwave-safe bowl
Step-by-Step Instructions:
- Melt Chocolate: Carefully melt chocolate in a microwave-safe bowl with adult supervision.
- Insert Stick: Push a lollipop stick into the center of a marshmallow.
- Dip and Decorate: Dip a marshmallow into melted chocolate. Immediately stick candy corn feathers to the top, eyes to the front, and licorice string as the wattle.
- Let Harden: Set on wax paper to cool and harden for 10–15 minutes.
- Enjoy or Share: Wrap in cellophane to give away, or let kids enjoy their handmade treat.
Learning Benefits:
- Introduces sequencing and food safety (with adult help)
- Strengthens coordination and spatial planning
- Blends creativity with a real-world reward (eating!)
23. Cereal Box Turkey
Repurpose an empty cereal box into a cheerful, three-dimensional turkey. This large, bold project is perfect for classrooms or Thanksgiving home displays and helps preschoolers grasp the concept of upcycling.
Materiali necessari:
- Empty cereal box
- Brown wrapping paper or paint
- Colored construction paper
- Googly eyes
- Glue stick
- Scissors
- Markers for detailing
Step-by-Step Instructions:
- Cover the Box: Wrap the box in brown paper or paint it brown and let it dry.
- Make the Feathers: Cut out large feather shapes from colorful paper and decorate with markers or stickers.
- Attach Feathers: Glue feathers to the back of the box so they fan out above the turkey.
- Create the Face: Add eyes, beak, and wattle to the front using cutouts and glue.
- Add Legs or Accessories: Draw or glue on legs at the bottom, or add a fun bow tie.
Learning Benefits:
- Introduces recycling and environmental awareness
- Builds larger-scale assembly skills
- Encourages collaborative creativity (ideal for group projects)
24. Pumpkin Stress Balls
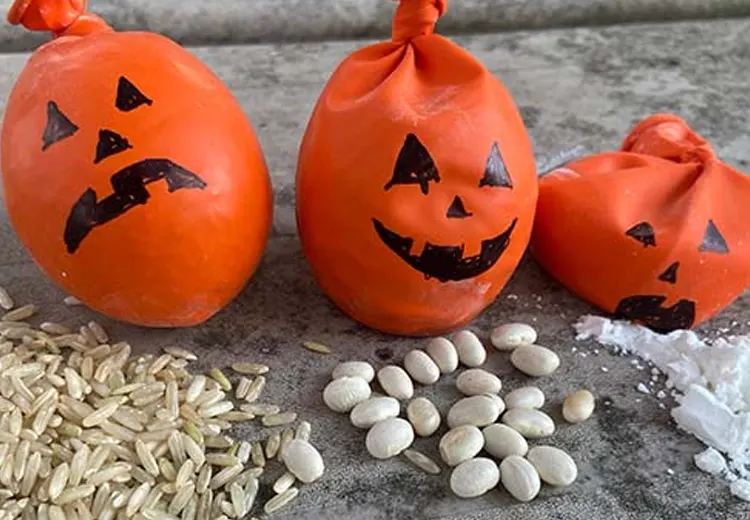
Who says preschoolers don’t get stressed? These squishy, DIY pumpkin stress balls are a perfect sensory tool and offer an opportunity to learn about pumpkins while strengthening hand muscles.
Materiali necessari:
- Orange balloons
- Flour, rice, or play sand (filling)
- Funnel
- Green pipe cleaners
- Black marker
- Scissors
Step-by-Step Instructions:
- Fill the Balloon: Insert the funnel into the balloon and pour in filling until the balloon is firm.
- Tie and Seal: Knot the balloon tightly to prevent leaks.
- Decorate the Pumpkin: Twist a green pipe cleaner around the knot to make a stem and vine.
- Add a Face: Use a black marker to draw a pumpkin face—funny, spooky, or silly.
- Use Gently: Let your child squish, roll, or toss (safely) for sensory fun.
Learning Benefits:
- Strengthens grip and finger muscles
- Supports self-regulation and sensory development
- Teaches functional crafting with a calming benefit
25. Wooden Spoon Scarecrow
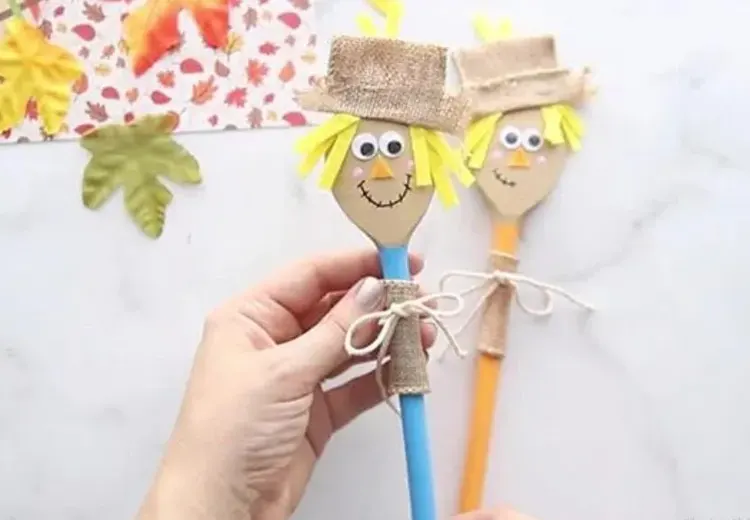
Bring a touch of farm charm to Thanksgiving with a scarecrow puppet made from a simple wooden spoon. It’s great for storytelling and encourages children to invent characters or act out seasonal scenes.
Materiali necessari:
- Wooden spoon
- Felt or fabric scraps
- Yarn or raffia (for hair)
- Googly eyes
- Marcatori
- Glue gun (with adult assistance) or craft glue
- Construction paper
Step-by-Step Instructions:
- Make the Face: Draw or glue eyes, a nose, and a smile onto the spoon’s rounded end.
- Add Hair: Glue raffia or yarn to the back of the spoon for hair.
- Create Clothes: Use fabric scraps or construction paper to make a shirt and overalls. Glue onto the spoon’s handle.
- Add a Hat: Cut out a mini felt hat and attach it to the top.
- Optional Arms: Add pipe cleaners or paper arms for more fun.
Learning Benefits:
- Develops storytelling through puppet play
- Reinforces character development and social learning
- Encourages multi-material crafting and sequencing
26. Craft Stick Scarecrow
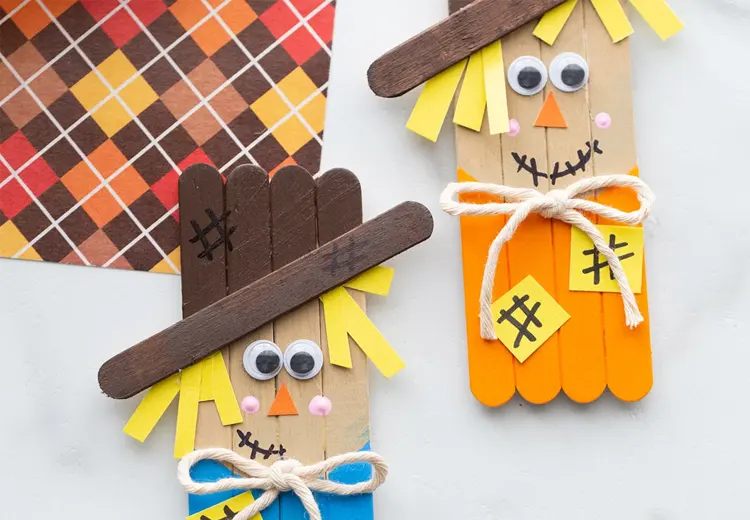
This smiling scarecrow made from craft sticks brings farmyard fun to the classroom or home. It’s a versatile craft that can be used as a puppet, a hanging ornament, or even a name tag on the Thanksgiving table.
Materiali necessari:
- Popsicle sticks (5–7 per scarecrow)
- Glue
- Paint or markers (tan, orange, black)
- Googly eyes
- Fabric or felt scraps (for hats and clothes)
- Raffia or yarn (for hair)
- Black marker
Step-by-Step Instructions:
- Create the Base: Line up 5–6 popsicle sticks side by side and glue a horizontal stick across the top to hold them together.
- Paint the Face: Paint the center area tan for the scarecrow’s face. Let dry.
- Add Hair: Glue raffia or yarn strands peeking out from under where the hat will sit.
- Make the Hat: Cut a triangle or rectangle from fabric/felt and glue it to the top of the scarecrow.
- Decorate the Face: Add googly eyes, draw on a stitched smile, and cut out a small paper triangle for the nose.
- Optional Embellishments: Add buttons, bow ties, or patches for extra charm.
Learning Benefits:
- Enhances spatial awareness
- Promotes storytelling and puppet role play
- Reinforces concepts of harvest and rural traditions
27. Pom-Pom Turkey
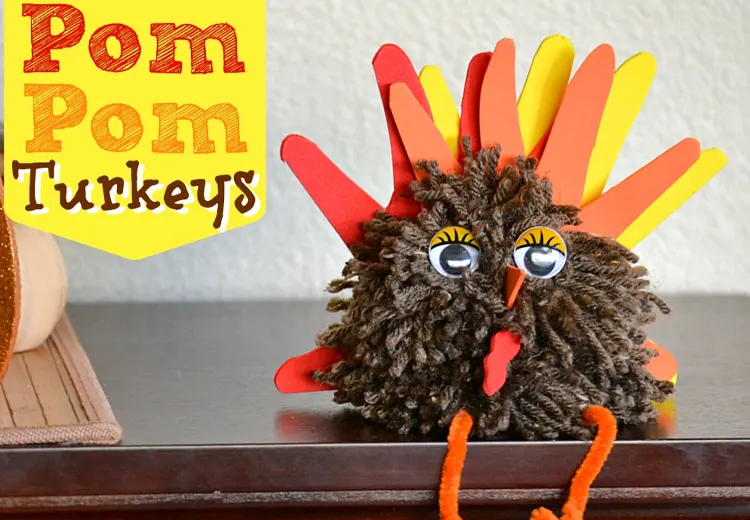
Fluffy, bright, and bursting with personality, these pom-pom turkeys are perfect for tabletop decorations or pretend play. Kids adore the soft texture and get hands-on experience with miniature design.
Materiali necessari:
- Large brown pom-poms
- Small orange and red pom-poms
- Googly eyes
- Colored foam or felt (for feathers and beak)
- Glue
- Scissors
Step-by-Step Instructions:
- Attach Eyes: Glue two googly eyes to the front of the large brown pom-pom.
- Add the Beak and Wattle: Glue a tiny orange triangle for the beak and a small red pom-pom or felt piece for the wattle beneath the eyes.
- Make the Tail Feathers: Cut feather shapes from foam or felt in fall colors and glue to the back of the large pom-pom in a fan shape.
- Add Feet (Optional): Glue small foam feet or orange paper triangles under the base for added detail.
Learning Benefits:
- Supports precision gluing and small-motor manipulation
- Encourages imaginative play and animal recognition
- Teaches shape matching and basic assembly skills
28. Corn Husk Headband
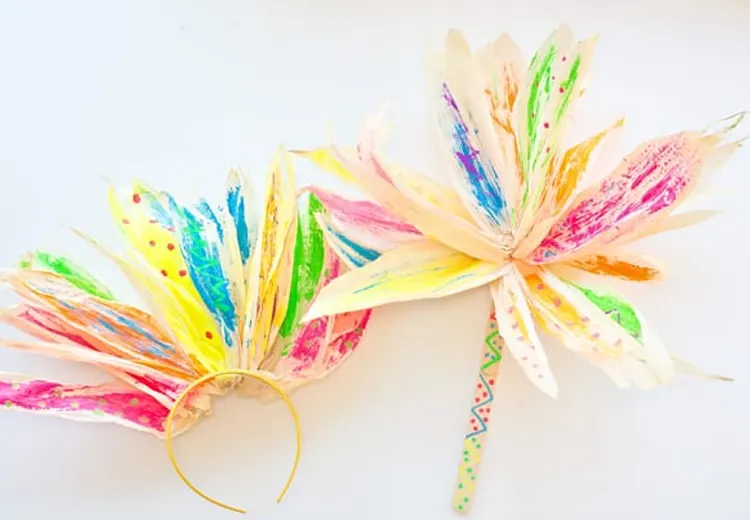
Celebrate Thanksgiving with a corn-themed twist. This headband turns your child into a little stalk of corn, combining agricultural learning with wearable fun.
Materiali necessari:
- Green and yellow construction paper
- Scissors
- Stapler or tape
- Glue
- Markers or crayons
Step-by-Step Instructions:
- Make the Band: Cut a long strip of green paper to fit around the child’s head. Staple or tape ends together to form a headband.
- Create the Corn: Cut out a large yellow oval and draw or glue small kernels in a grid pattern using orange or brown markers.
- Add Husks: Cut two long green leaf shapes and glue them behind the corn to form husks.
- Attach to Headband: Glue or staple the corn and husks to the front center of the headband.
- Decorate (Optional): Let kids color their husks or add glitter glue for fun textures.
Learning Benefits:
- Introduces agricultural vocabulary and food origins
- Strengthens cutting and measuring skills
- Encourages holiday role play and performance
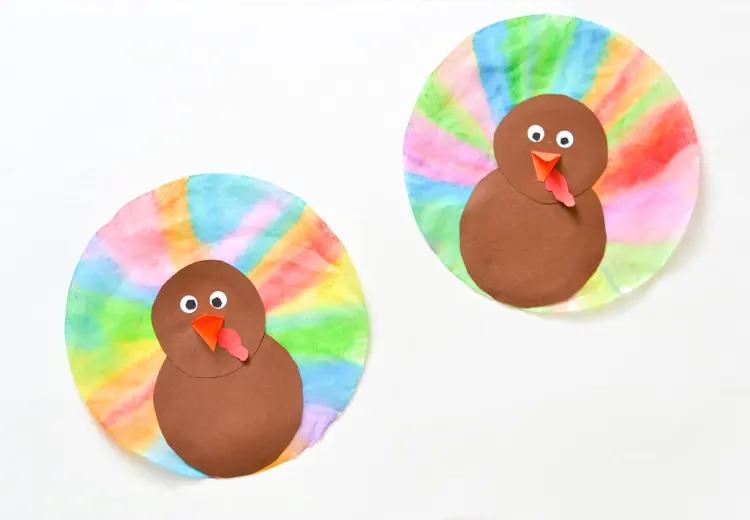
29. Turkey Blow Painting
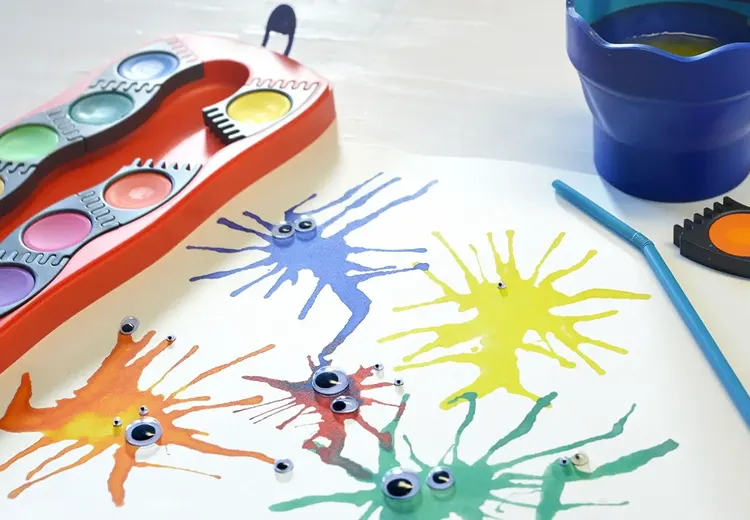
This abstract art project adds a kinetic twist to turkey crafting by using straws and breath to “blow” watercolor paint across the paper, forming feathers for a turkey unlike any other.
Materiali necessari:
- Watercolor or diluted paint
- White paper
- Plastic straw
- Glue
- Googly eyes
- Construction paper (for body, beak, and feet)
- Eye dropper or paintbrush
Step-by-Step Instructions:
- Drop the Paint: Place small drops of watercolor paint on paper where the turkey’s tail feathers will be.
- Blow the Paint: Use a straw to blow each drop outward to form streaks—these are the feathers.
- Create the Body: While the paint dries, cut out a circle or oval from brown paper and decorate with eyes, a beak, and feet.
- Assemble the Turkey: Once the paint has dried, glue the body in the center of the blown feathers.
- Add Final Touches: Use markers to outline or label your creation.
Learning Benefits:
- Builds oral motor strength and breath control
- Introduces cause-and-effect concepts
- Encourages artistic freedom and exploration
30. Apple Turkey Crafts
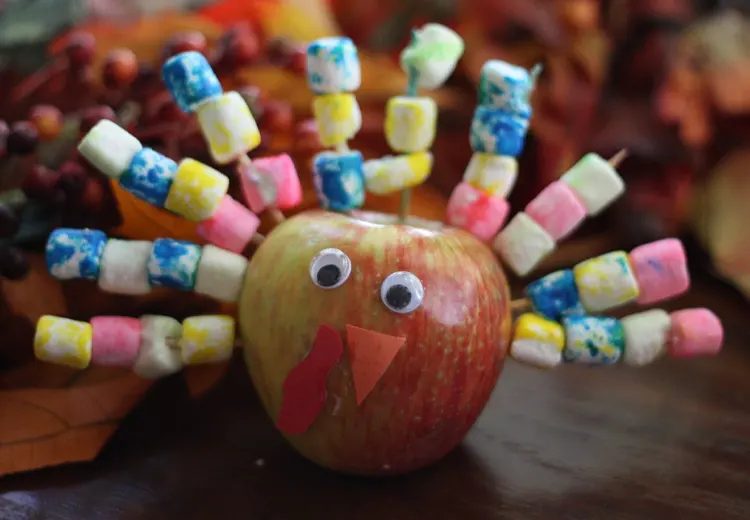
With a fresh apple as the base, this edible turkey combines crafting with snack time. It’s a multisensory, healthy activity that makes an excellent Thanksgiving table centerpiece or lunchbox surprise.
Materiali necessari:
- 1 apple per child
- Toothpicks
- Grapes, mini marshmallows, or cranberries
- Candy eyes or raisins
- Red licorice string (for wattle)
- Orange triangle (cheese slice or carrot piece)
Step-by-Step Instructions:
- Prepare the Apple: Wash and dry it. Set it stem side up.
- Create Feathers: Thread grapes or marshmallows onto toothpicks and stick them into the back of the apple to form a fan shape.
- Make the Face: Push two small candy eyes or raisins into the front. Add a wattle and a tiny triangle for the beak.
- Finish and Serve: Display as table décor, or enjoy as a snack.
Learning Benefits:
- Teaches safe food handling with supervision
- Combines nutrition awareness with hands-on art
- Builds sequencing and spatial understanding
31. Beaded Pipe Cleaner Pumpkin
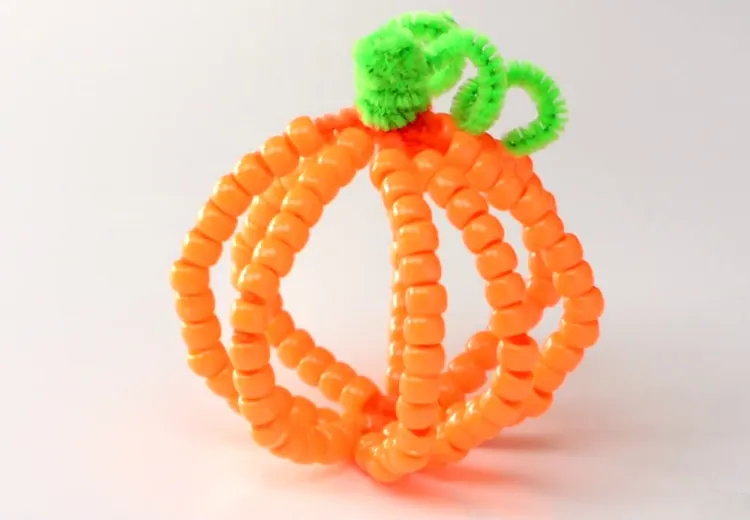
This vibrant, hands-on craft transforms a humble pipe cleaner into a sparkling pumpkin using colorful beads. It’s excellent for fine motor skills and introduces preschoolers to basic crafting patterns.
Materiali necessari:
- Orange pipe cleaners
- Green pipe cleaner (for stem)
- Orange pony beads or round beads
- Scissors
Step-by-Step Instructions:
- Thread the Beads: Let children slide orange beads onto the orange pipe cleaner until nearly full, leaving about 1/2 inch at both ends.
- Shape the Pumpkin: Curve the beaded pipe cleaner into a circular pumpkin shape and twist the ends to secure.
- Add the Stem: Wrap a short green pipe cleaner around the top, curling it to resemble a vine or twisting it into a small loop.
- Display or Hang: These mini pumpkins can stand on tables or be hung as ornaments.
Learning Benefits:
- Boosts hand-eye coordination
- Reinforces color sorting and sequencing
- Introduces 3D shapes and form recognition
32. Turkey Painted Rocks
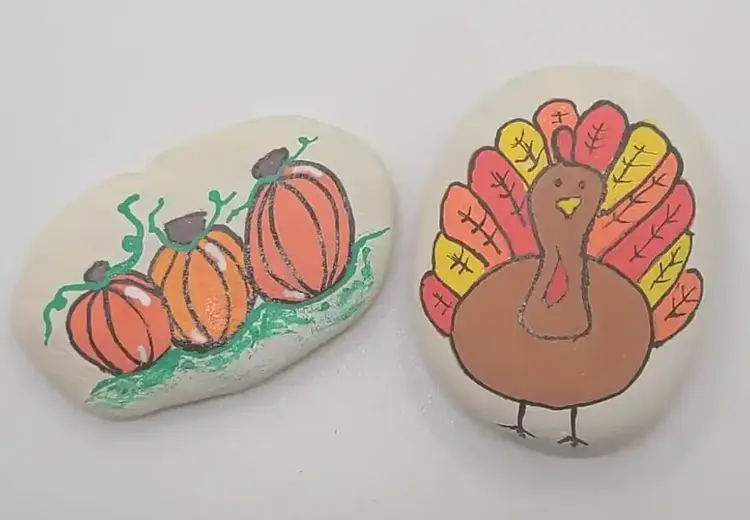
Nature meets craft with these adorable turkey rock decorations. Kids love painting smooth stones and turning them into friendly fall characters. These also make thoughtful gifts or garden ornaments.
Materiali necessari:
- Smooth flat rocks (washed and dry)
- Acrylic paint (brown, orange, red, yellow)
- Paintbrushes
- Googly eyes
- Felt or paper feathers
- Glue
Step-by-Step Instructions:
- Paint the Rock: Cover the rock in brown paint and let it dry completely.
- Add Features: Paint on a beak, cheeks, and glue googly eyes to the front.
- Attach Feathers: Glue paper or felt feathers to the back, fanning out like a tail.
- Optional Details: Use a marker or white paint to add extra texture and detail.
Learning Benefits:
- Encourages creative use of natural materials
- Teaches surface texture management
- Offers emotional expression through character design
33. Thanksgiving Turkey Leaf Lantern
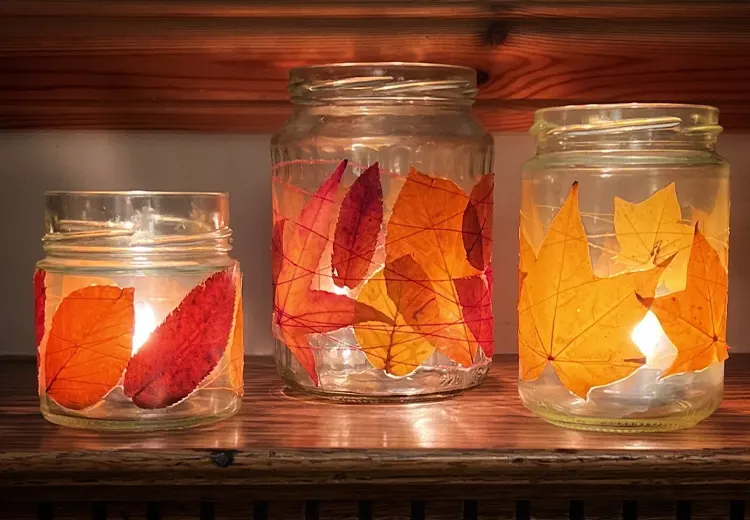
Turn a recycled jar into a glowing leaf lantern using tissue paper and a little imagination. This soothing craft doubles as a cozy nightlight and reminds children of what they’re thankful for each time it lights up.
Materiali necessari:
- Mason jar or clear plastic cup
- Tissue paper in fall colors
- Mod Podge or watered-down glue
- Paintbrush
- Battery-operated tealight
- Googly eyes and paper for a turkey face
- Construction paper for feathers (optional)
Step-by-Step Instructions:
- Tear and Layer Tissue: Tear tissue into small pieces and apply to the jar using a paintbrush and glue. Overlap for vibrant color effects.
- Create Turkey Face: Cut out a beak, eyes, and wattle from paper and glue onto the front of the lantern.
- Add Feathers (Optional): Glue paper feathers to the back side or rim of the jar.
- Dry and Light: Allow glue to dry fully. Then insert a flameless tealight for a glowing effect.
Learning Benefits:
- Builds sensory focus and calm through layered design
- Introduces safe lighting and nighttime ambiance
- Reinforces gratitude through symbolism
34. Thanksgiving Chain
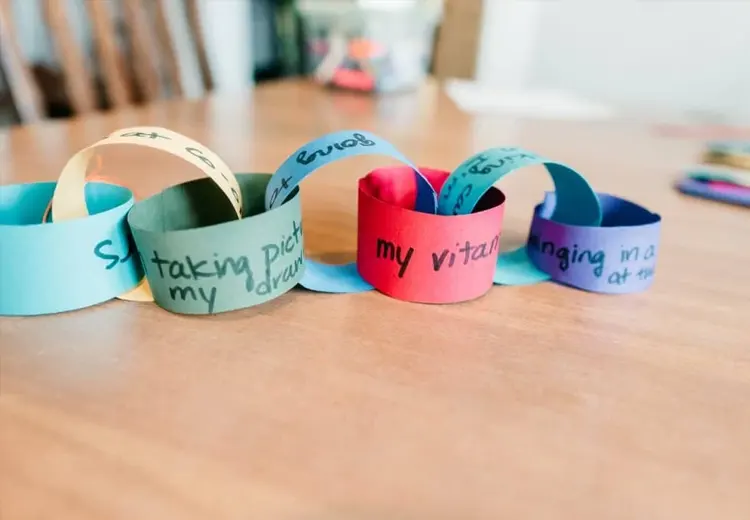
A classic classroom or home decoration, the Thanksgiving Chain helps children visualize gratitude day by day. Each paper link includes something they’re thankful for, building anticipation and reflection toward the holiday.
Materiali necessari:
- Construction paper in fall colors
- Scissors
- Glue stick or tape
- Markers or crayons
Step-by-Step Instructions:
- Cut Paper Strips: Cut paper into strips about 1 inch wide and 6 inches long.
- Write Gratitude Notes: Each day, help your child write or draw one thing they’re thankful for on a strip.
- Form the Chain: Loop the first strip into a circle and glue/tape the ends. Continue linking each new strip to the previous one.
- Display the Chain: Hang across a wall, doorway, or dining area. Let it grow longer each day until Thanksgiving.
Learning Benefits:
- Builds emotional intelligence and gratitude
- Strengthens writing and drawing confidence
- Reinforces calendar awareness and sequencing
Tips for Thanksgiving Crafting with Preschoolers
Preschoolers have short attention spans and sometimes messy hands. Here are tips we give to educators who buy our preschool furniture and supplies:
- Break projects into stages. Prep materials in advance.
- Use group collaboration to reduce wait time.
- Emphasize the process, not the outcome.
- Let each child make decisions—colors, shapes, names.
- Always praise effort over result.
Crafting is not a performance—it’s a learning experience.
How These Thanksgiving Crafts Support Early Childhood Development
You might wonder, beyond fun, what educational value do these activities bring? A lot.
Crafting during Thanksgiving reinforces:
- Abilità motorie fini: Cutting, coloring, gluing.
- Emotional Intelligence: Expressing gratitude and storytelling.
- Competenze linguistiche: Naming colors, emotions, and describing their artwork.
- Cultural Awareness: Understanding traditions and symbols.
- Problem Solving: Following steps and fixing mistakes.
Montessori and Reggio approaches both support tactile learning. These crafts fit perfectly into our product philosophy—hands-on learning with a purpose.
Bonus: Decorating the Classroom with Kids’ Crafts
One of the joys of the Thanksgiving season is turning your classroom into a visual celebration.
Use the finished crafts to:
- Create a “Thankful Wall”
- Decorate bulletin boards with handmade wreaths and turkeys
- Hang crafts from the ceiling with fishing line
- Set up a corner “Craft Museum” for parent walkthroughs
Displaying children’s work boosts their confidence and builds community spirit among kids, parents, and staff.
Bring the Outdoors into Thanksgiving Crafts for Kids
Nature and Thanksgiving go hand in hand. Many Thanksgiving Crafts for Kids are even more meaningful when they incorporate real elements from the environment. Leaves, twigs, acorns, and pinecones are not only free—they’re deeply sensory and grounding for young learners.
We always recommend incorporating natural materials into craft time. Why? Because they engage all five senses. When a child touches a real leaf, smells the earthy pinecone, and turns a twig into part of a turkey’s tail, they’re forming real connections between nature and creativity.
Consider adding these nature-based projects:
- Leaf Turkeys: Use dried leaves as feathers on a paper turkey body.
- Twig Gratitude Trees: Stick real branches into a foam base and hang paper leaf notes with things kids are thankful for.
- Acorn Faces: Use markers or stickers to turn acorns into silly characters.
- Rock Painting: Turn small rocks into mini pumpkins, turkeys, or leaf patterns.
These Thanksgiving Crafts for Kids not only reduce reliance on synthetic materials but also deepen children’s respect for nature, one of the core values in Montessori and Reggio classrooms.
Domande frequenti
- Why choose Thanksgiving Crafts for Kids?
They help children learn gratitude, develop fine motor skills, and connect with family through fun activities. - What age are these crafts suitable for?
Crafts span toddlers (sensory bins, stickers) to elementary students (STEM, story‑driven crafts), catering to diverse skill levels. - How do I safely manage messier crafts?
Use washable materials, contain activities on trays or butcher paper, supervise glue/paint, and pre‑cut small pieces if needed. - How do I encourage picky kids?
Let them pick supplies, adapt crafts to their strengths (e.g., painting vs. gluing), and praise effort, not perfection. - Can these crafts double as decor?
Absolutely—many ideas (craft name cards, jar turkeys, placemats) become lasting Thanksgiving decorations. - How do I save these crafts?
Frame flat art, laminate placemats, photograph 3D items, and store those in memory boxes for future remembrance.
Conclusione
Thanksgiving crafts for kids are more than just entertainment—they are moments of magic, learning, and heartfelt tradition. These 34 creative ideas for preschoolers make it easy to keep little hands busy while reinforcing values like gratitude, community, and creativity. Whether you’re a teacher, parent, or caregiver, the projects above offer an inspiring starting point to make this Thanksgiving memorable.